ball opener mark 2
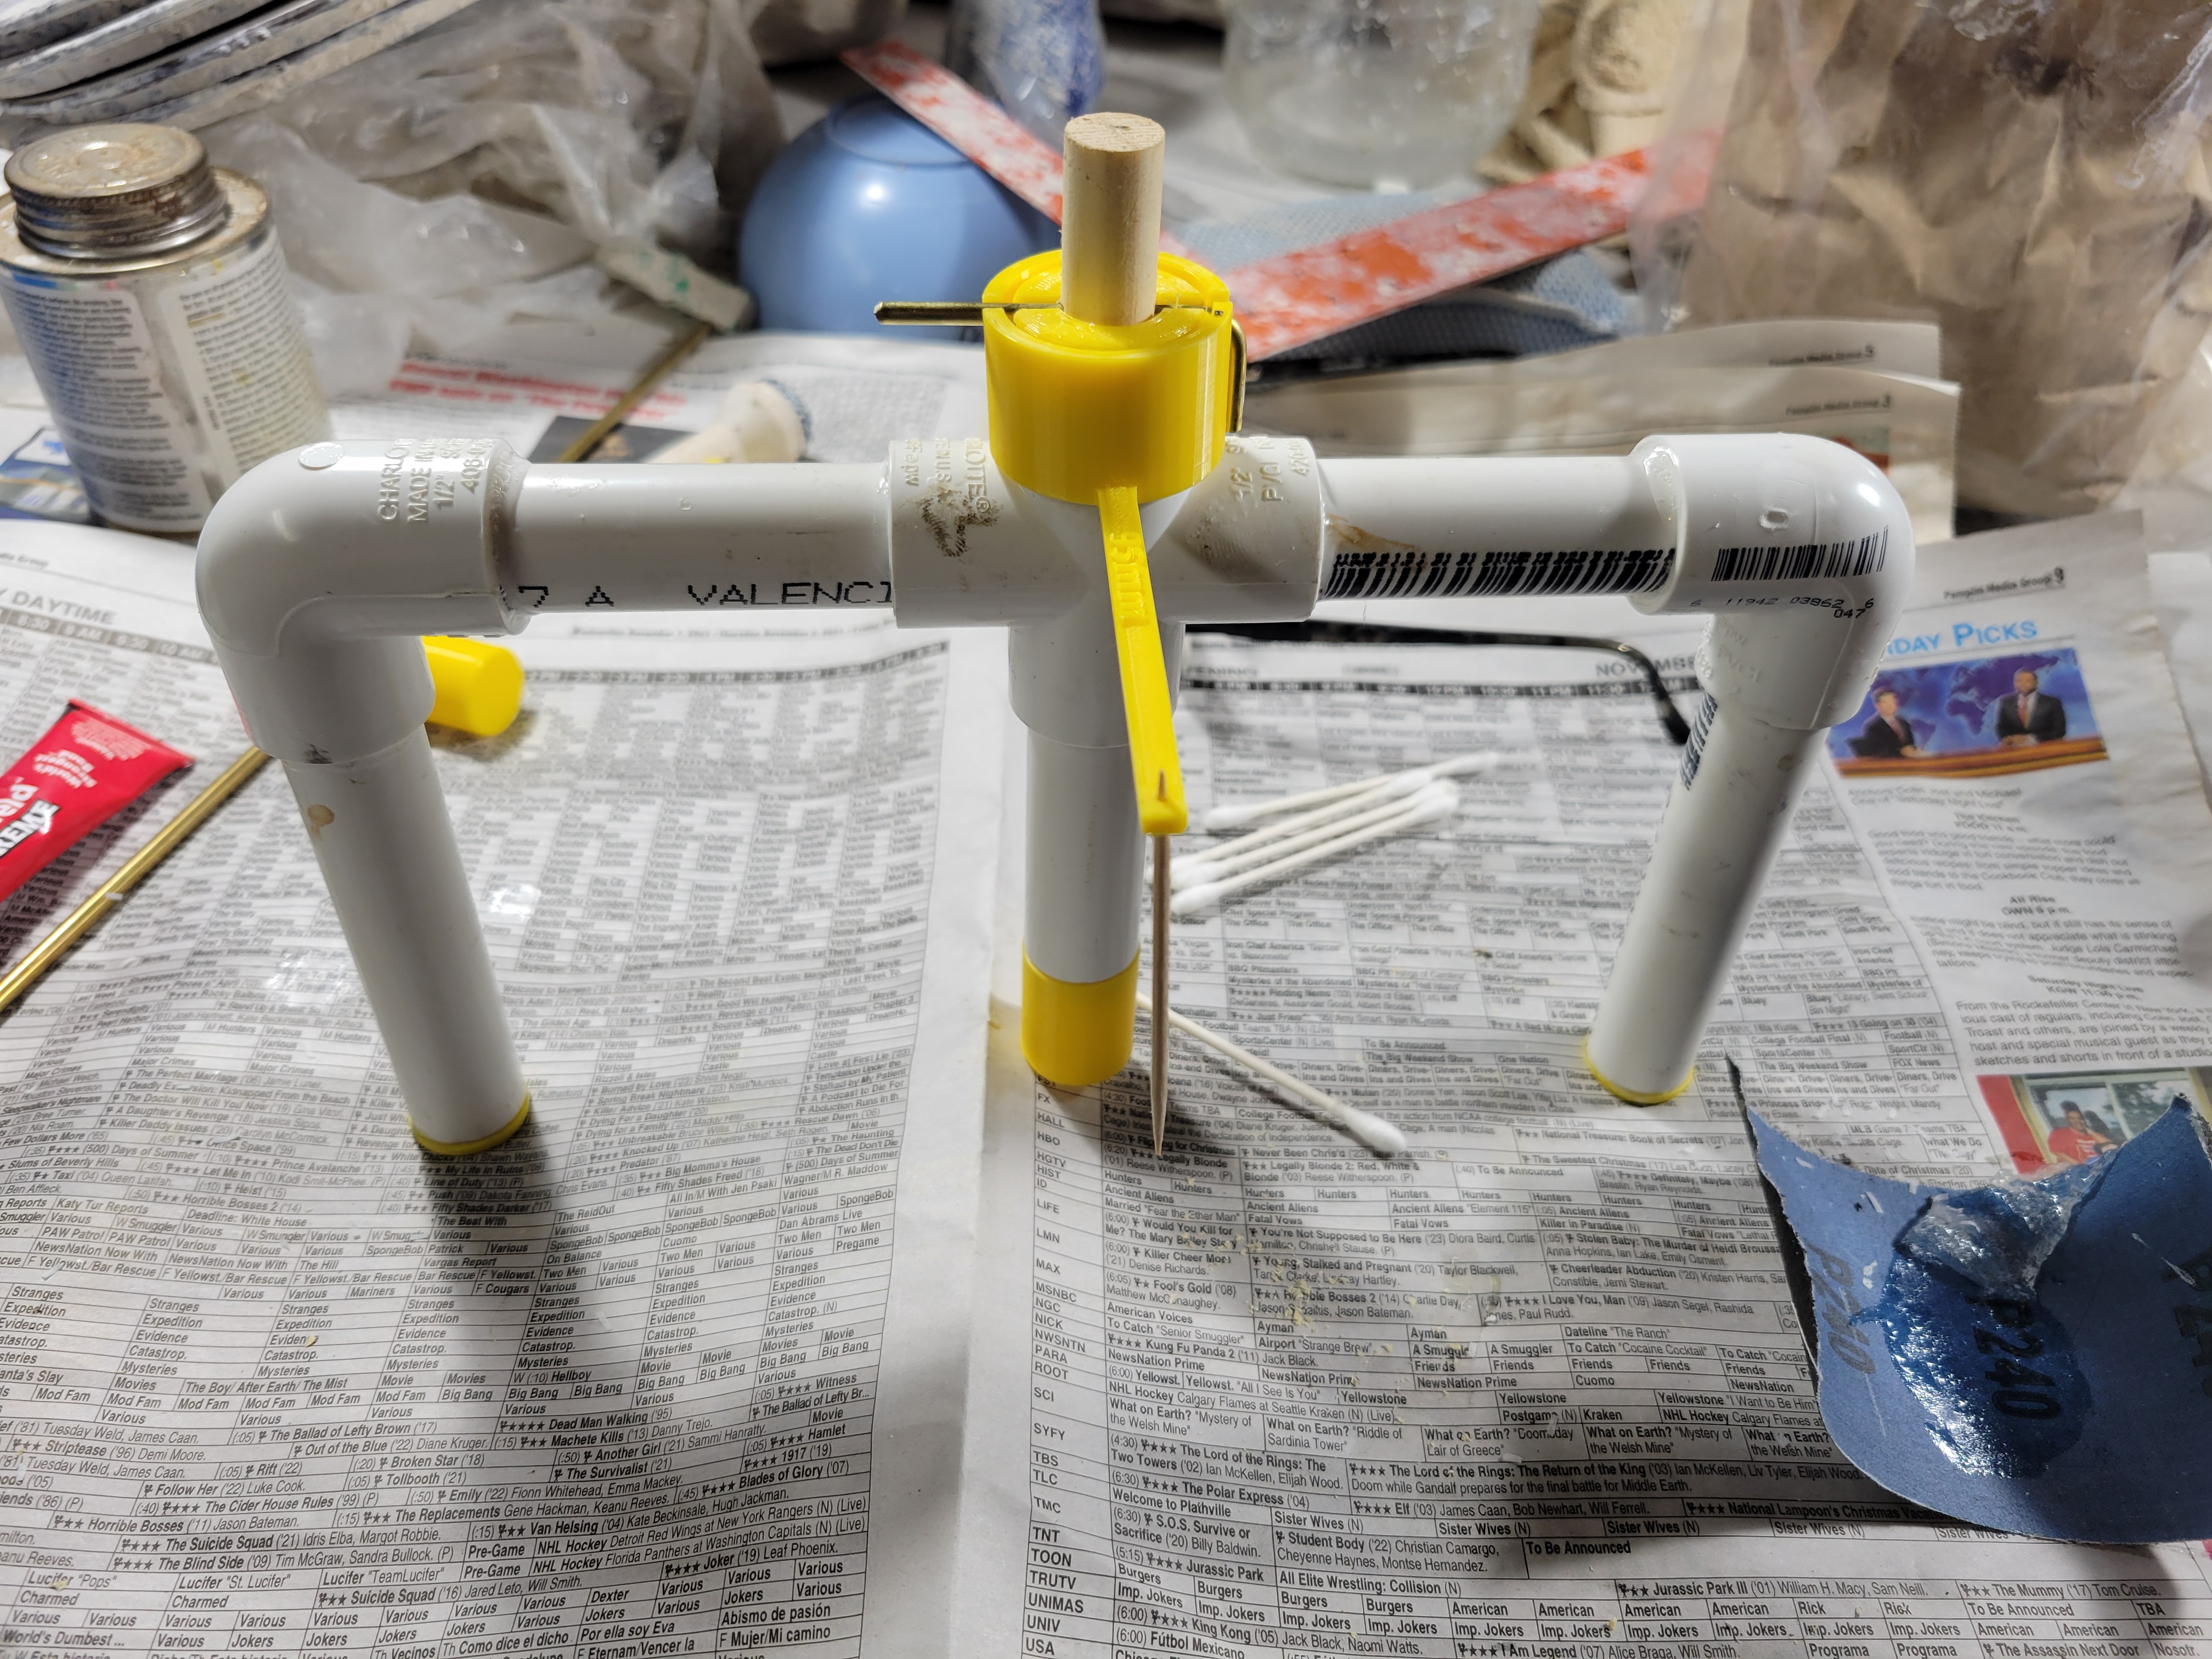
Lots of potters by now are familiar with the Ball Opener tool, popularized by Tom Whitaker. Speedball even has a version for sale, although I'd argue that it's inferior to one you make yourself from PVC. I use ball openers when I make matched sets, because making sure that the bottoms of all pieces are identical thickness makes it much easier to make them all identical.
After a few years of making plain glued PVC ball openers, I started thinking about how I could improve the device. Particularly, how could I incorporate 3D printed elements to make it better, and maybe make the thickness dynamically adjustable? I did a bunch of experimentation, and a bunch of trials, and have come up with a new design that I call "Ball Opener Mark 2". For any of you with a 3D printer and assembly skills, I think you'll find it a worthwhile improvement over the individual design.
Building The Mark 2
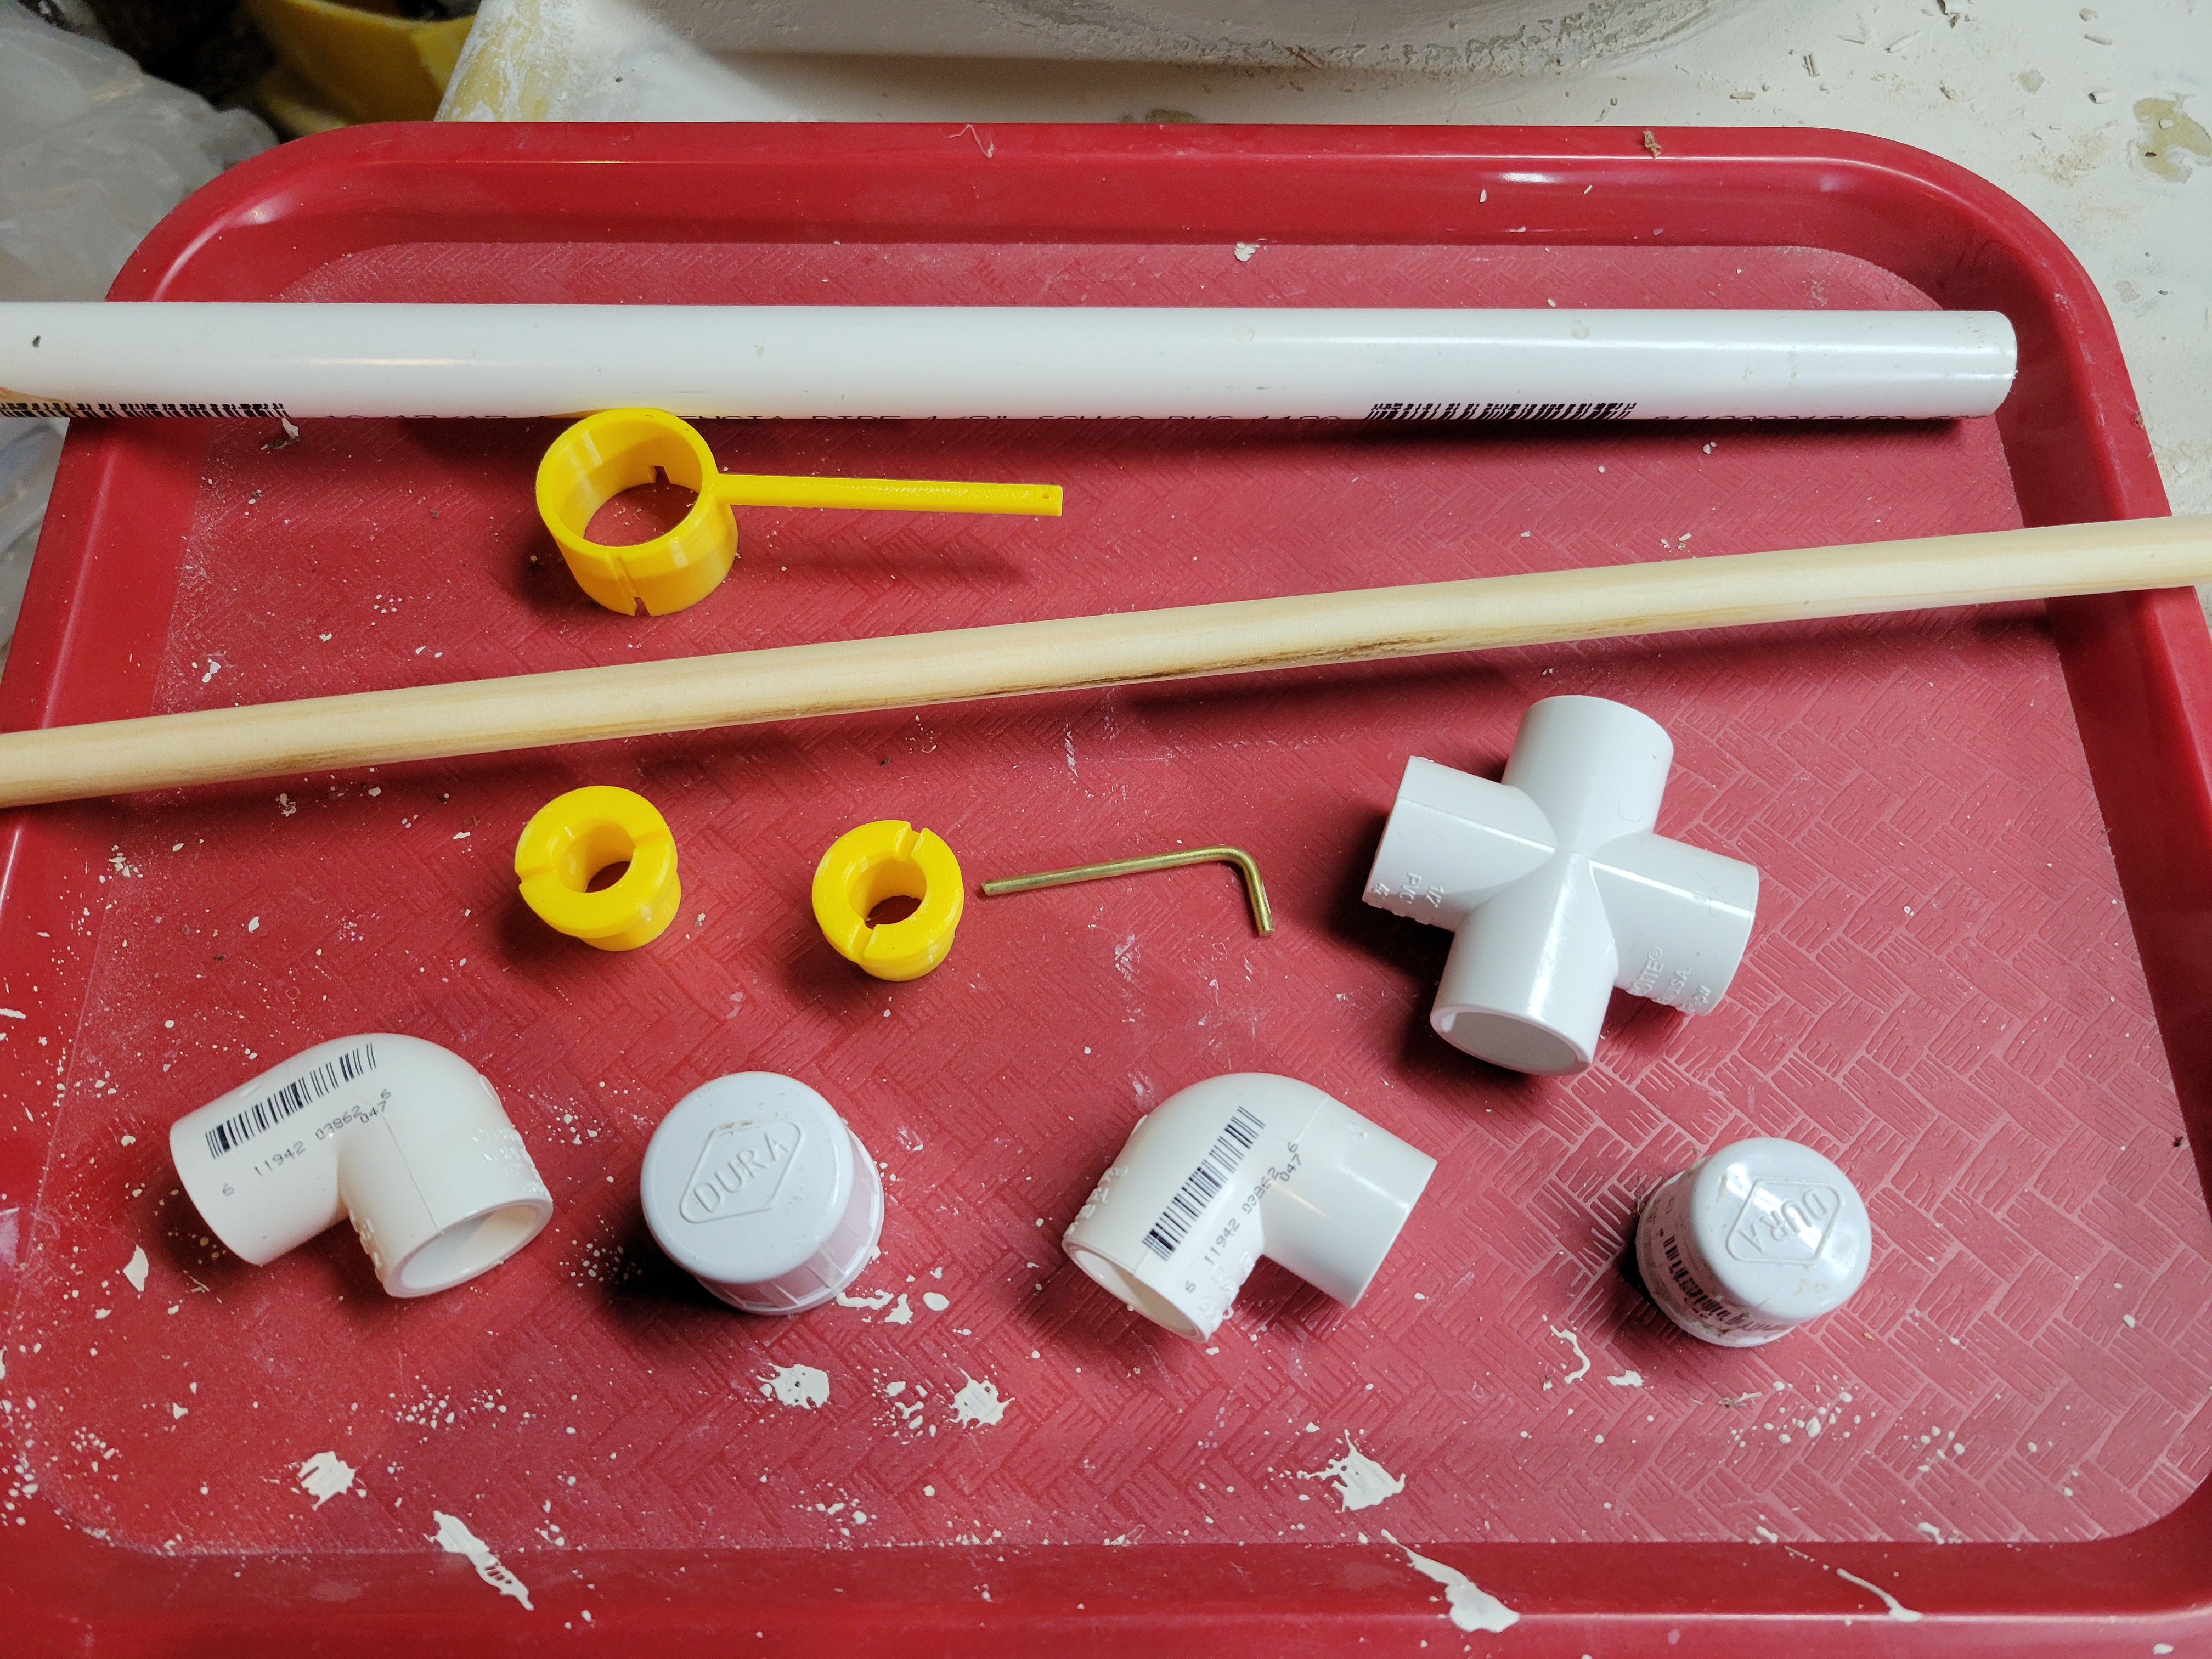
To make the Ball Opener Mark 2, you will need:
- 2-3ft of 1/2" thick wall PVC pipe
- A 4-way PVC junction and two elbows
- 3ft of 1/2" wooden dowel rod
- A cutoff, table, or band saw for cutting that pipe and dowel
- A power drill and 1/8" bit
- One 2.5" piece of 3mm brass rod
- PVC "glue"
- Superglue gel or E6000 glue
- All of the 3D printed elements included in this set
- A toothpick
First, you'll want to print all the 3D printed items for the Ball Opener. There's a bunch of them, so get started now. PLA filament is fine. See the notes in the Thingiverse entry on how to print them.
Cut the PVC pipe into two pieces 4.5" long, two pieces 3.5" long, and one piece 3" long. Fit the two 3.5" pieces on opposite sides of the 4-way junction, and cement them in with PVC glue. Fit the elbows onto the ends of those pieces, and glue them in, making sure that they are exactly parallel to one of the unused openings of the 4-way junction. Fit the two 4.5" pieces into the elbows and glue. Finally, glue the 3" piece in the 4-way opening on the same side as the other two pieces, forming an "M" out of PVC. Allow all the PVC glue to set, around 1 hour.
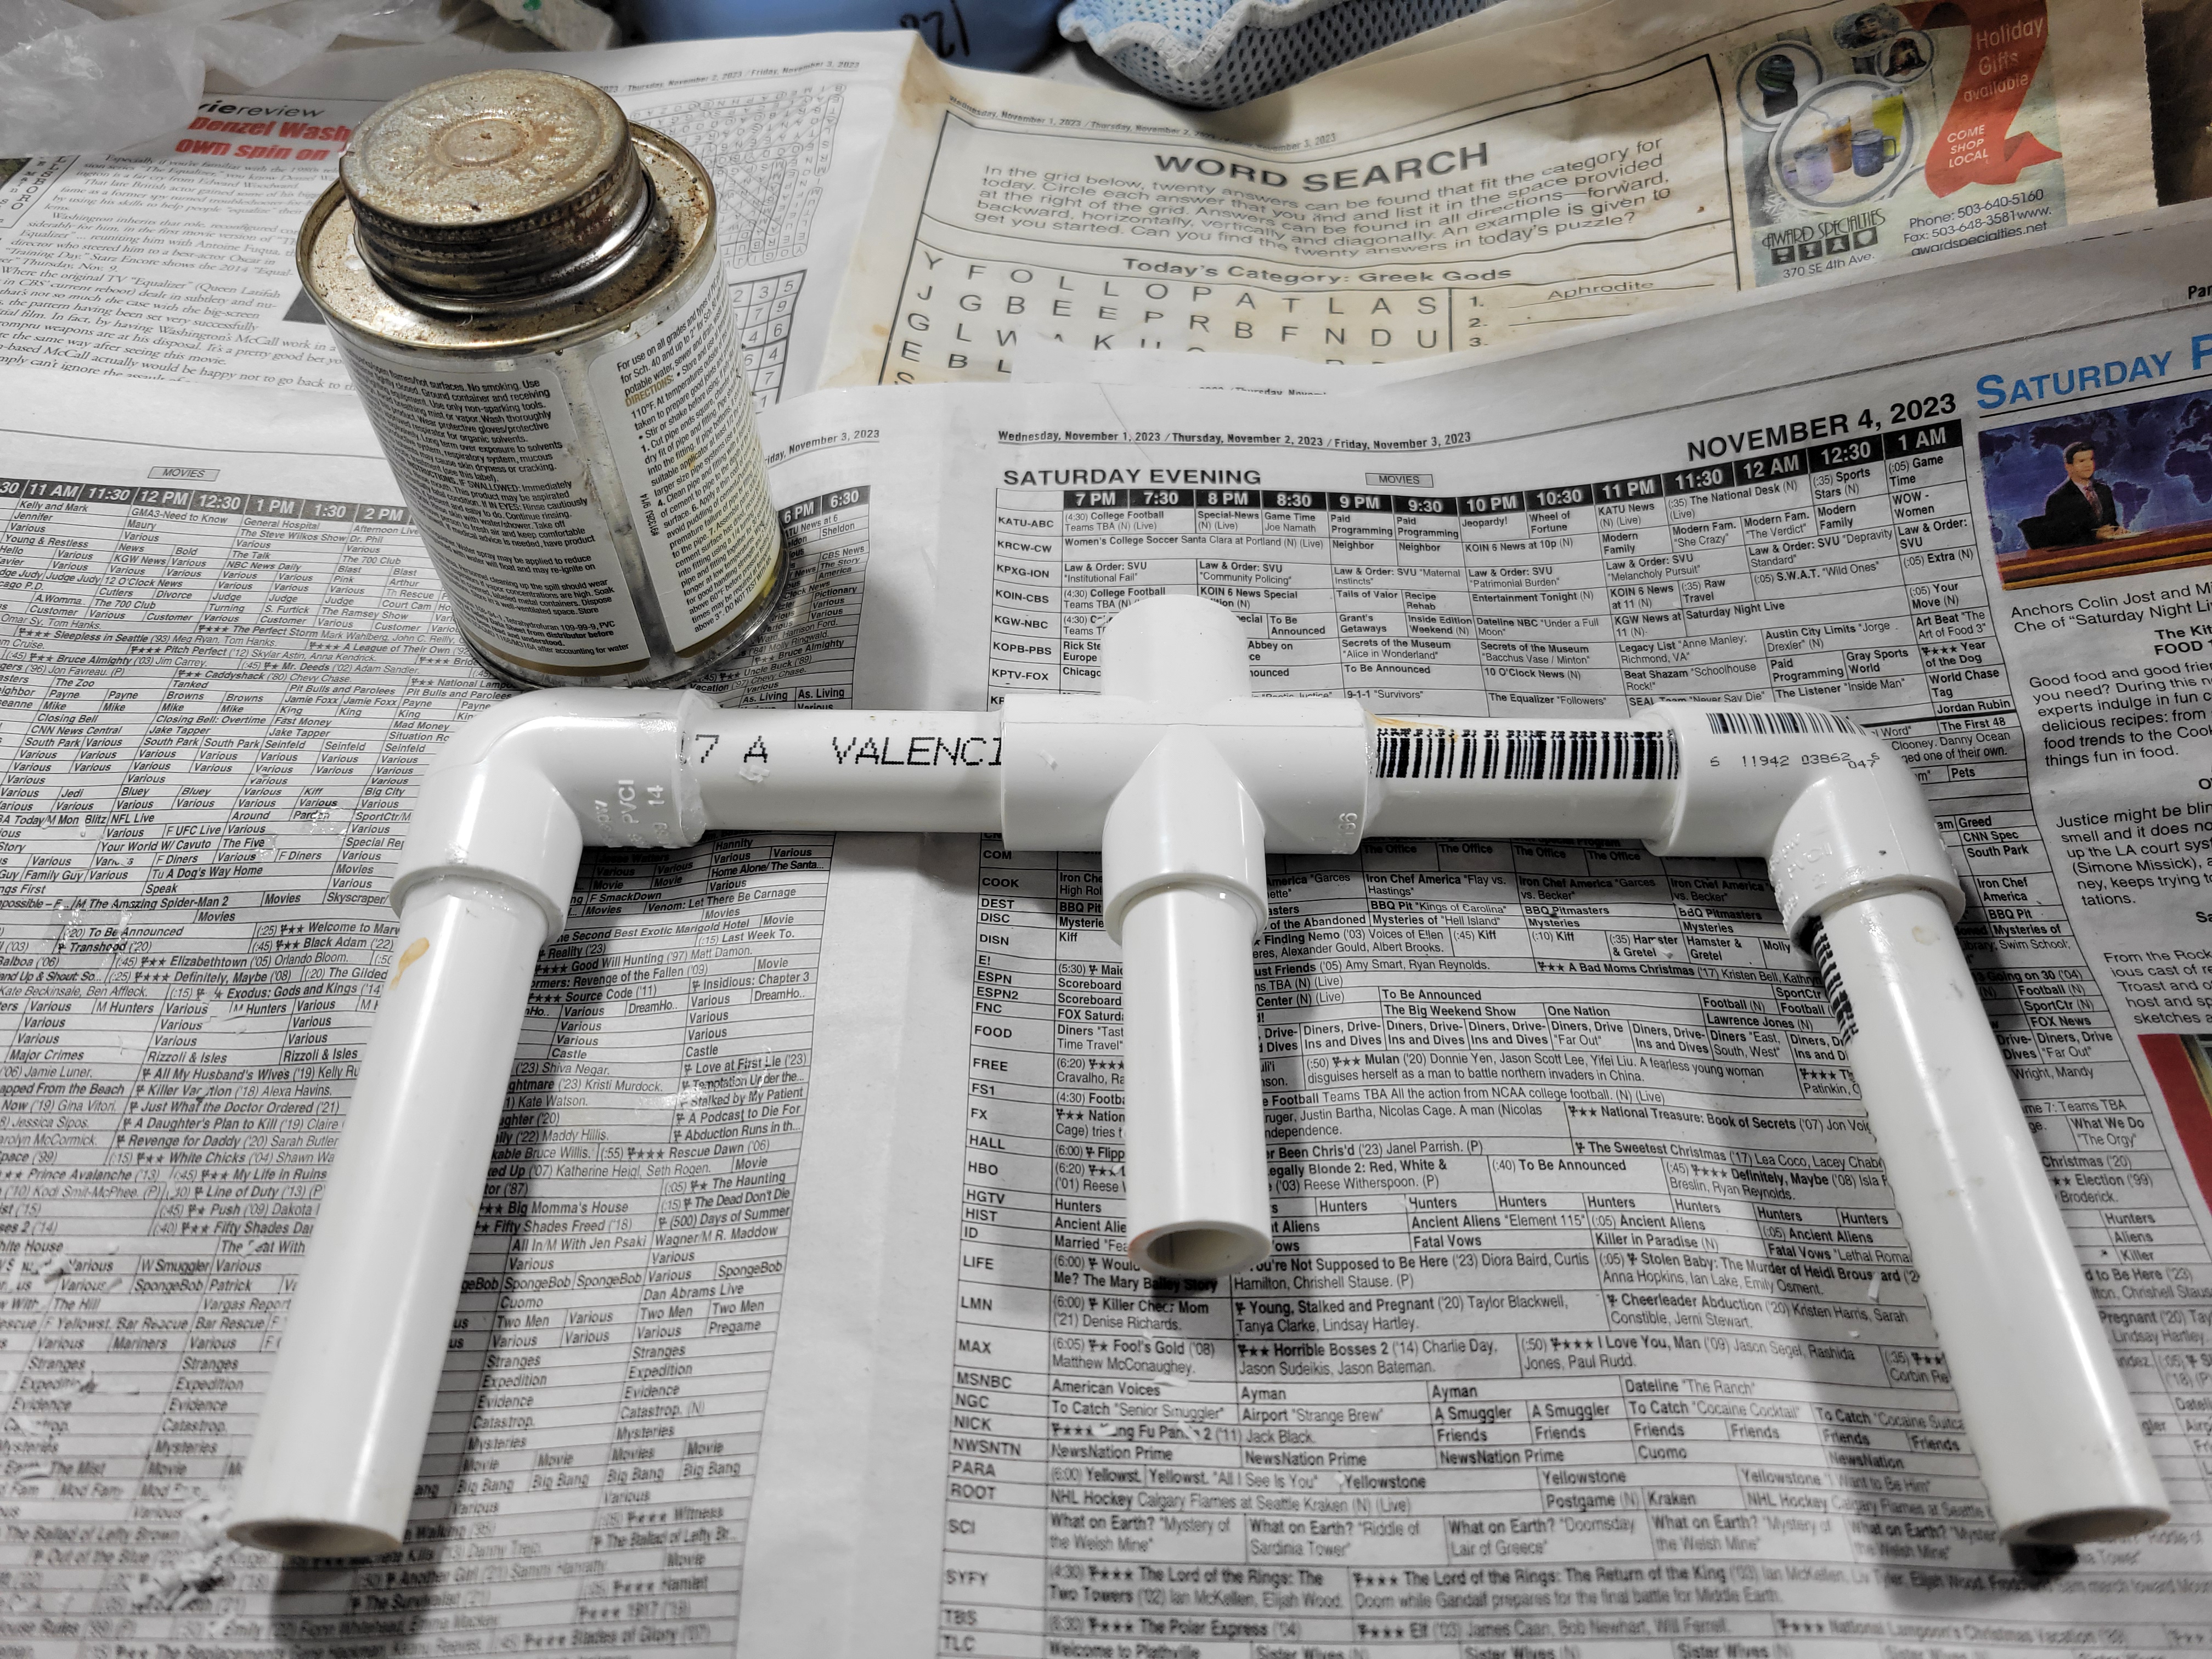
While the PVC glue is setting, cut three 6" pieces from the dowel rod. Attach each of the 3D printed ball opener Opener Tips to one of the dowel rods. Glue these in with the superglue/E6000. Bend down one end of the brass rod, about 1/2".
Once the PVC glue has set, glue in the rest of the 3D printed parts. The two PVC Plugs go on the two outer legs of the M; these are to keep the PVC from getting worn down by the friction of the wheel too fast. The Top Plug goes in the top of the 4-way junction. As you glue this in, make sure that the slot on top is exactly parallel with the PVC cross pieces. Now, time to wait for all that glue to dry, at least a couple hours.
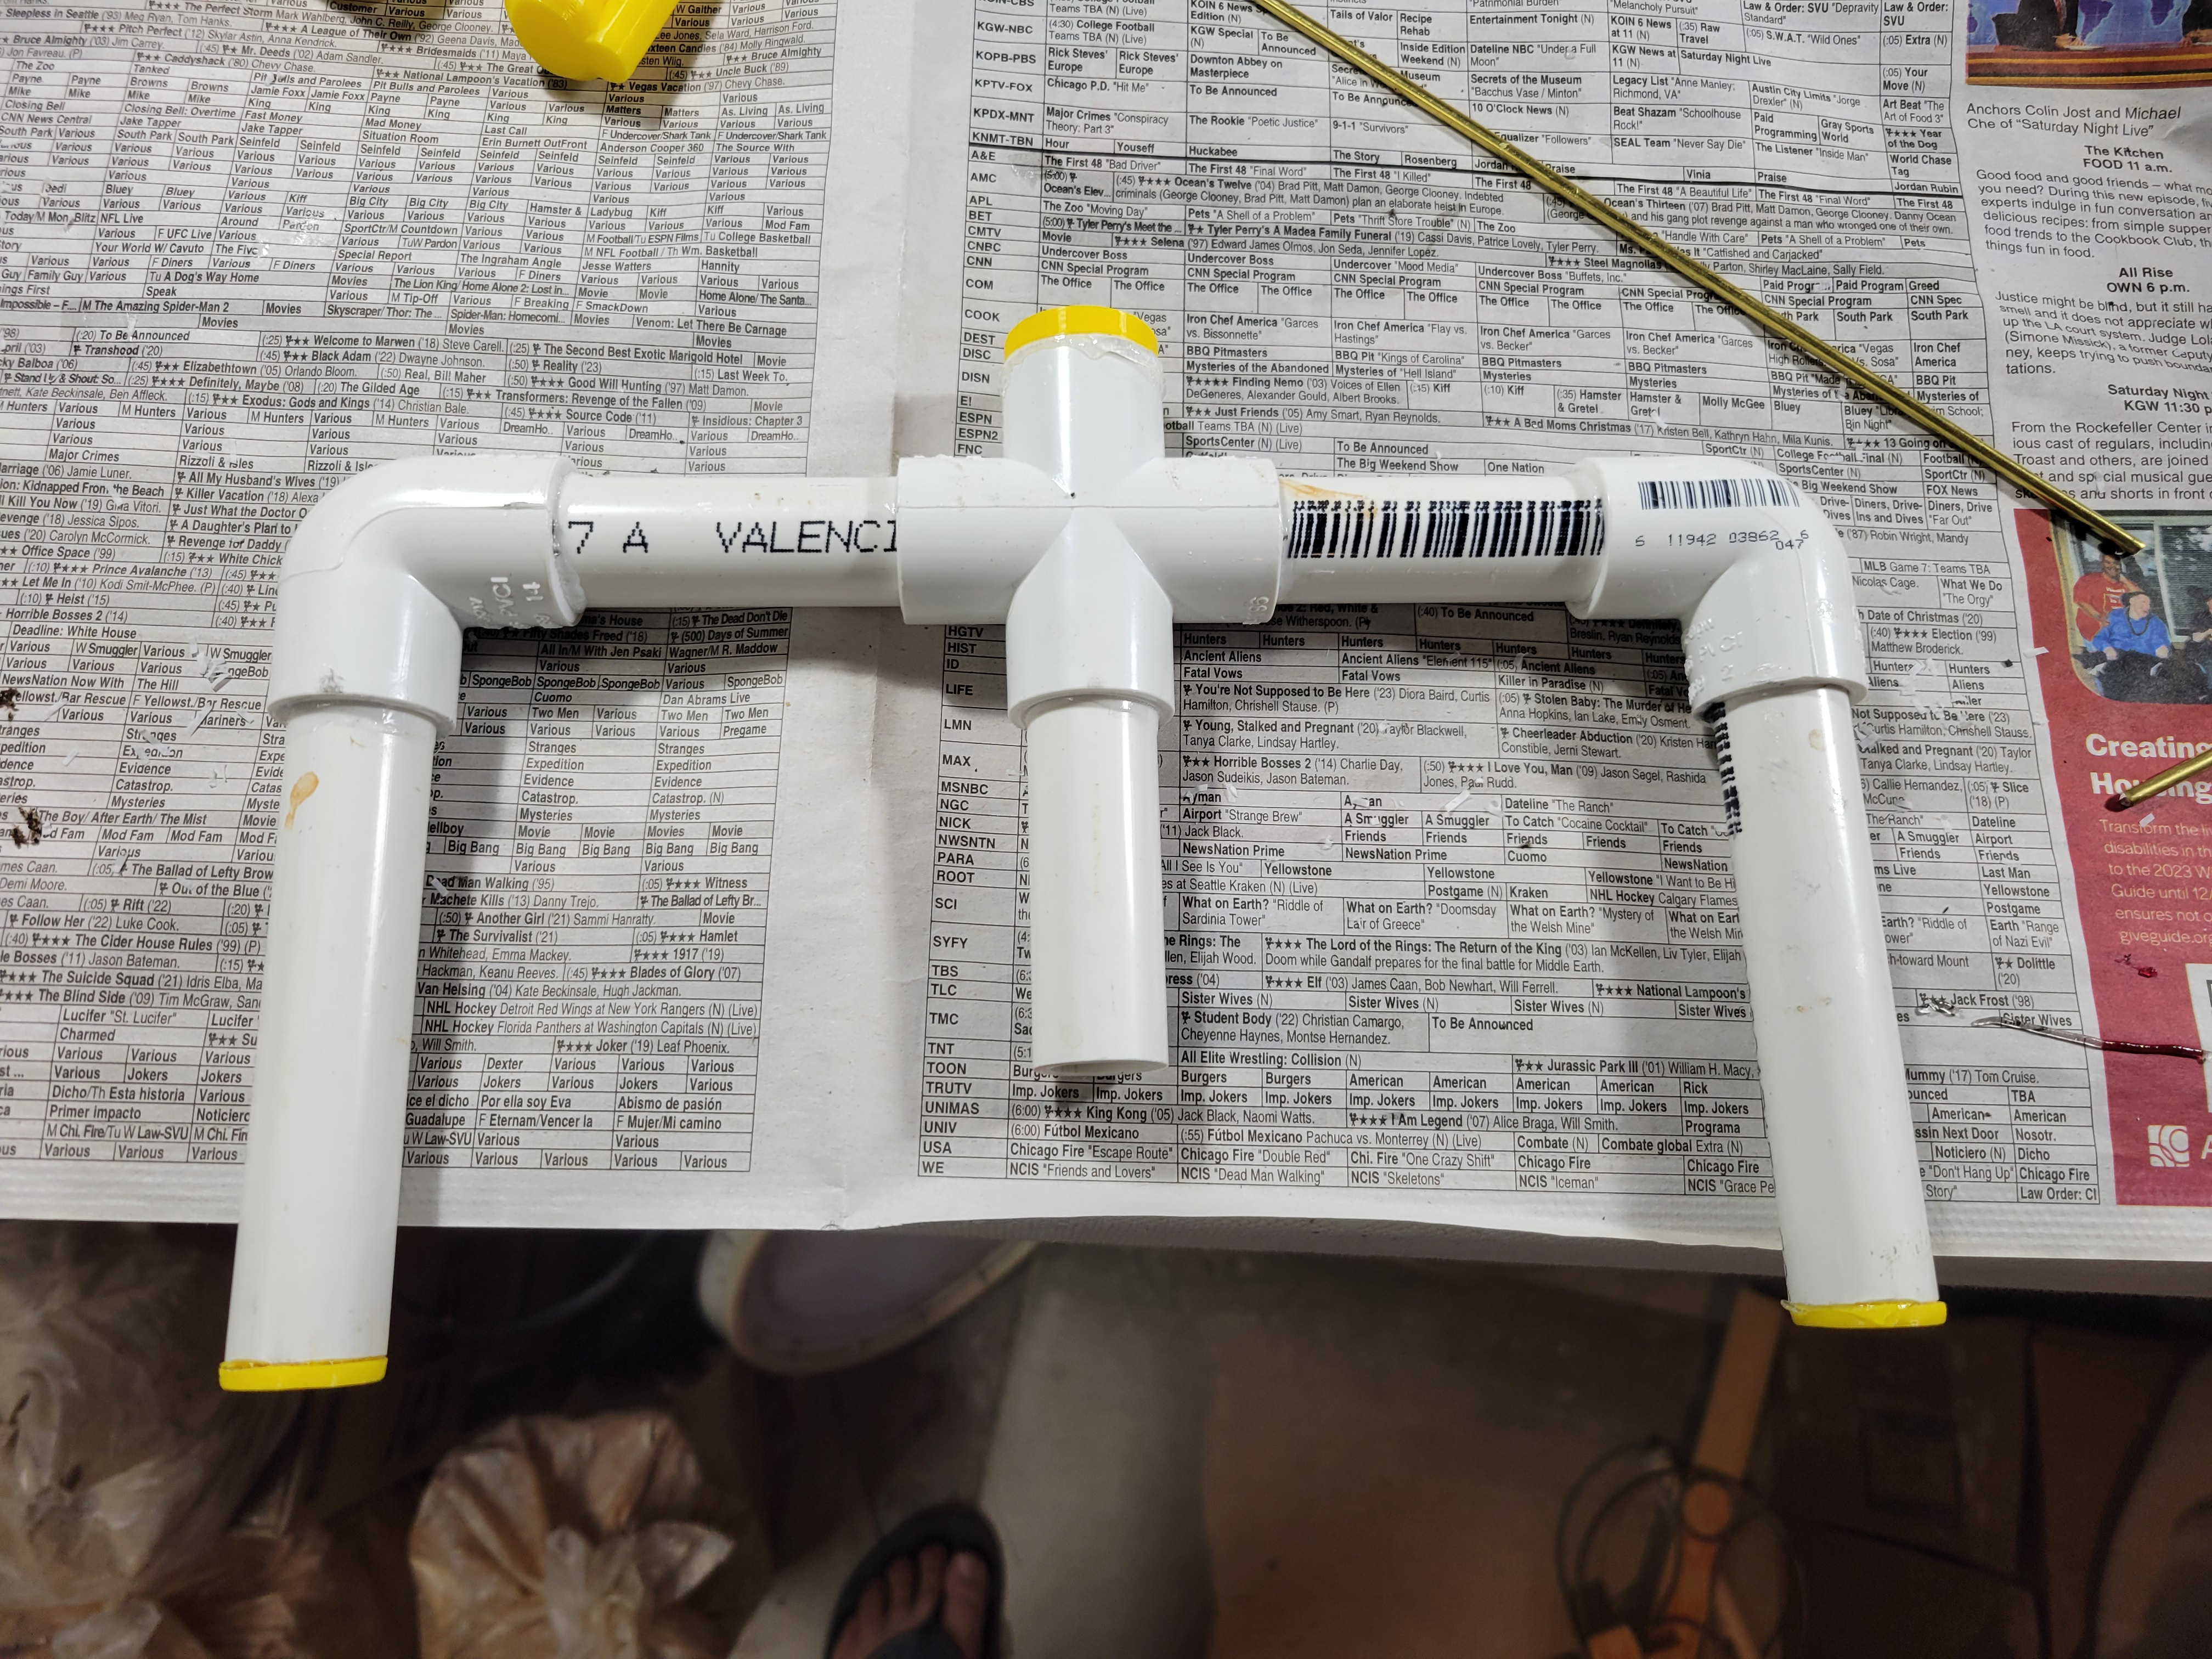
Once that's all set, fit each dowel into place by inserting it up through the center of the M. Mark the dowel rod where the slot in the Top Plug is. Take it back out and drill a hole through it at that mark. Repeat with the two other dowels. Label each dowel with its gauge thickness with a sharpie.
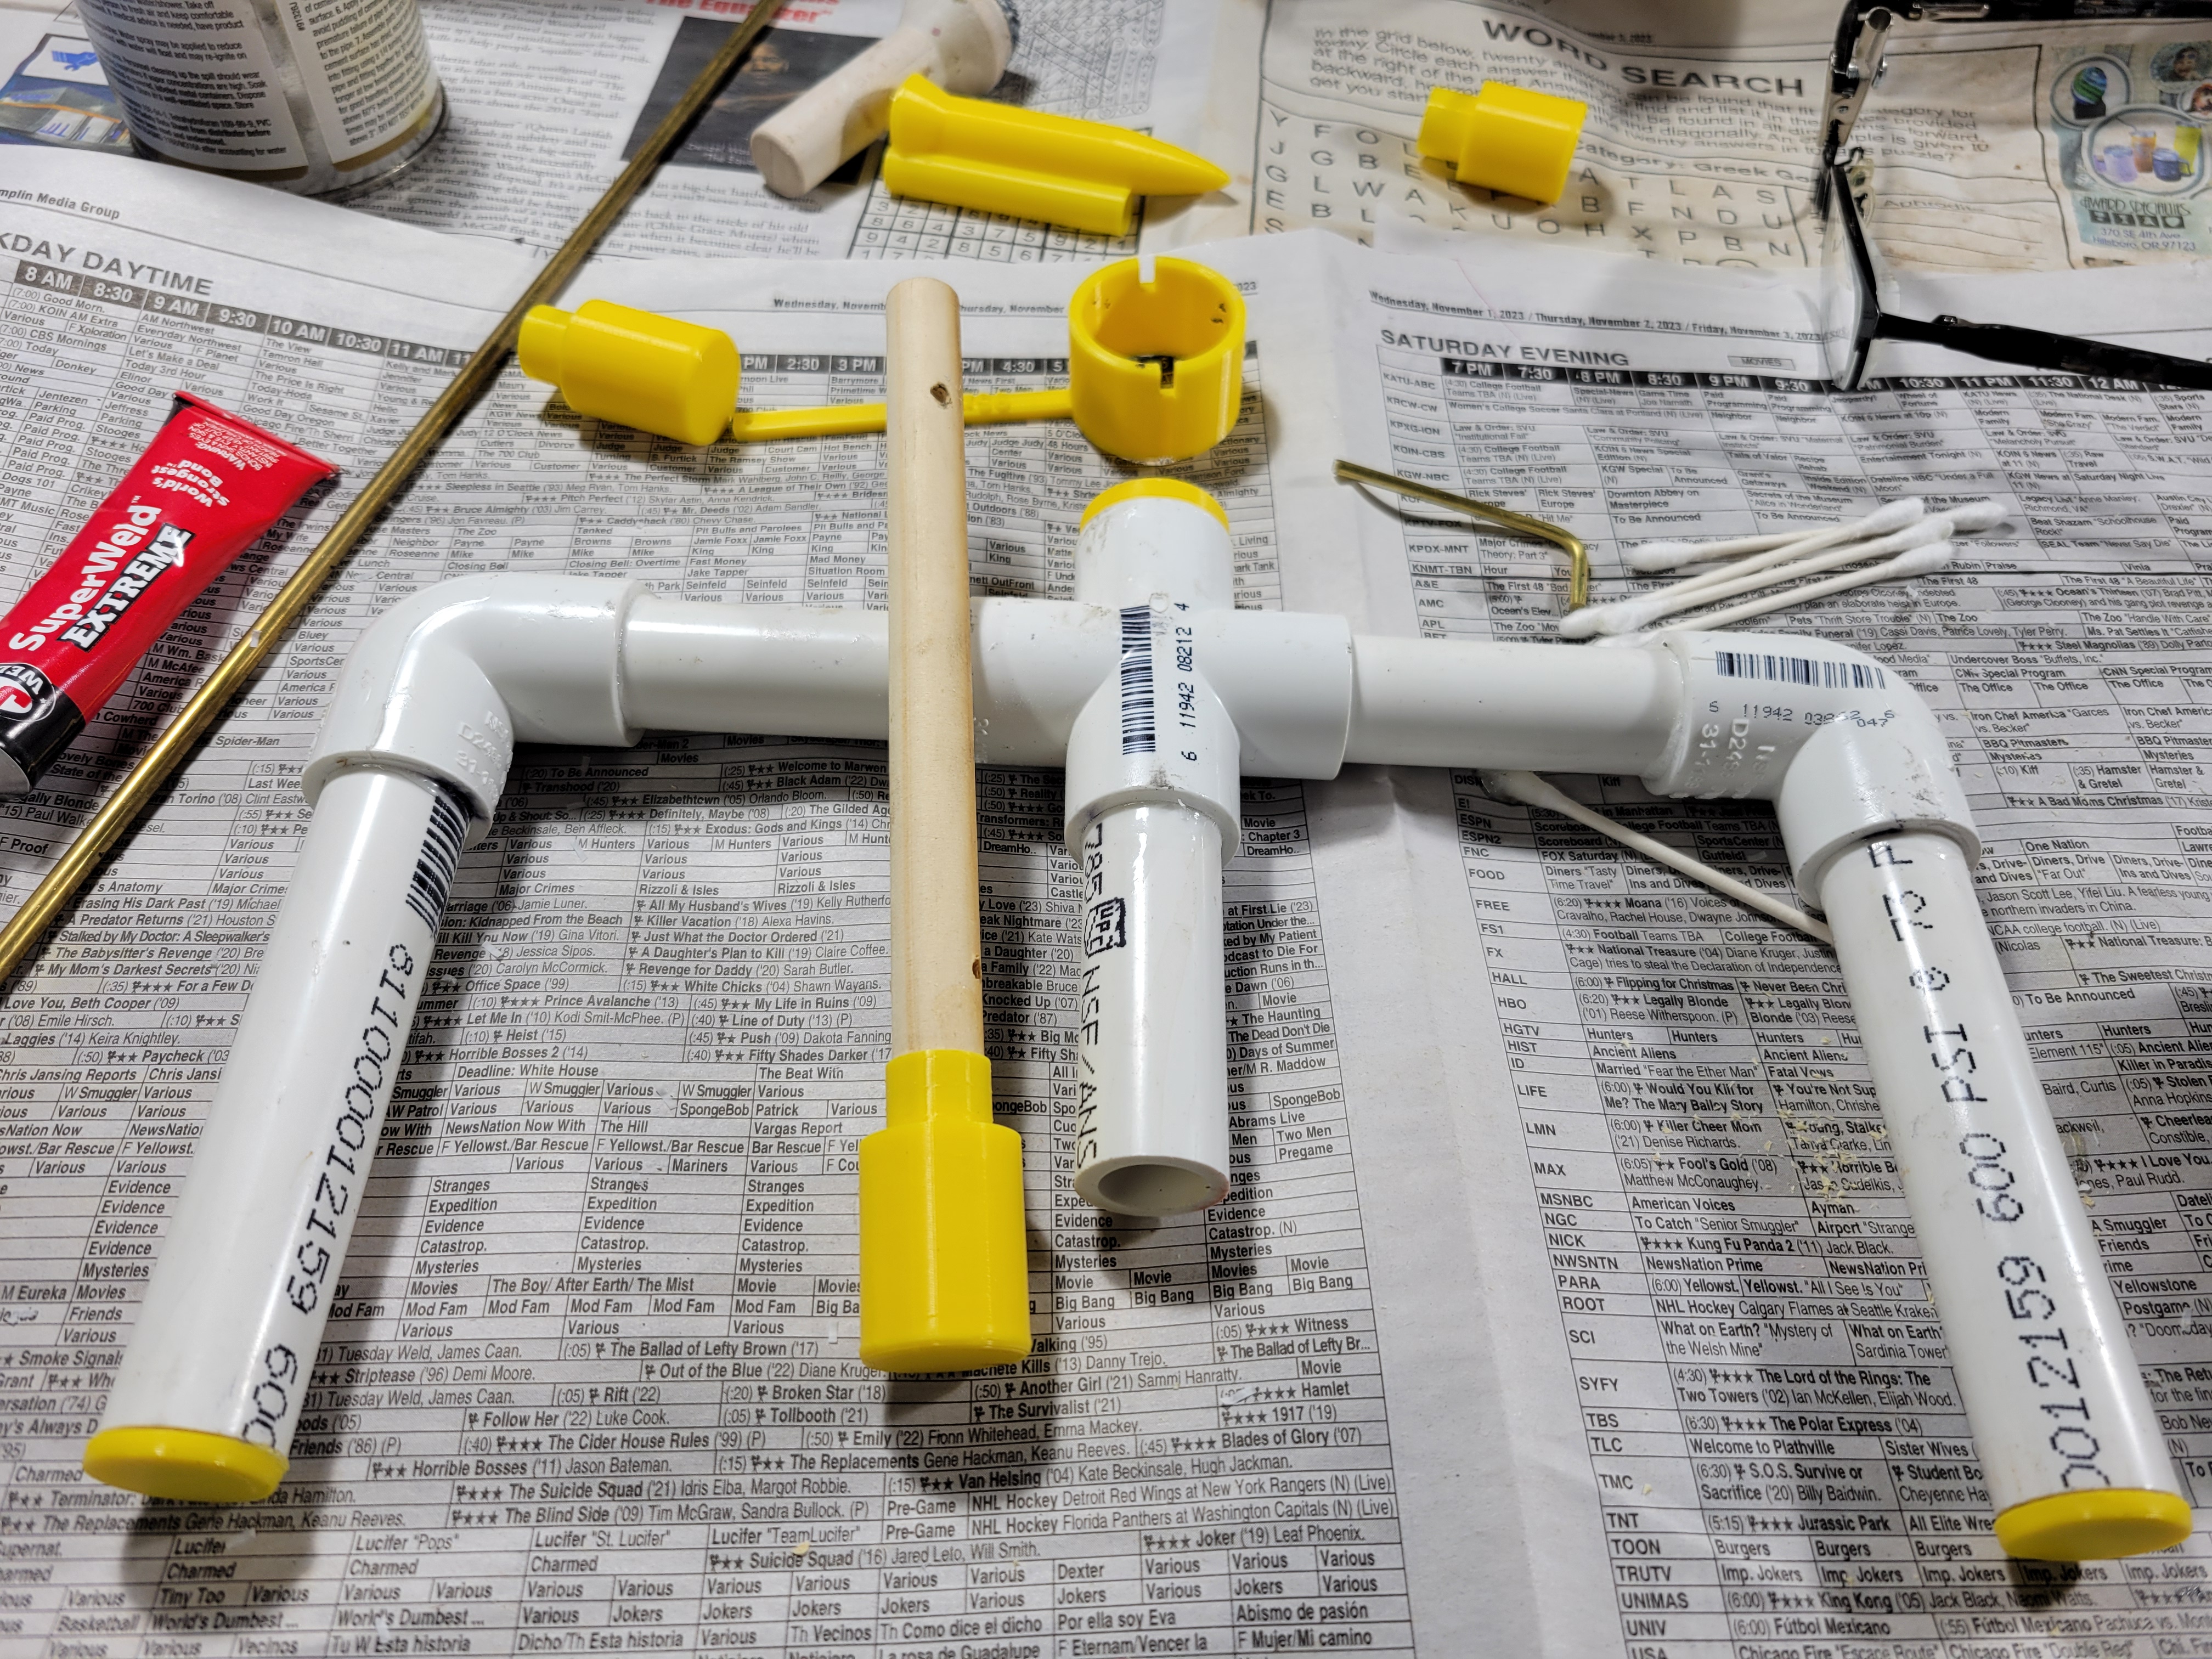
Your Mark 2 is now manufactured. You might want to wait overnight for all glue to be completely set.
Using the Mark 2
To use your new tool, push one of the Opener Tips with its dowel through the center of the M, and then anchor it using the brass rod. You can change the height by switching which of the Opener Tips you use, and you can (and should) 3D print more with different thicknesses. I have named the Opener Tips with the distance from the wheelhead, which becomes the thickness of the clay bottom. These distances are not exact, particularly given that none of us is precision-cutting our PVC.
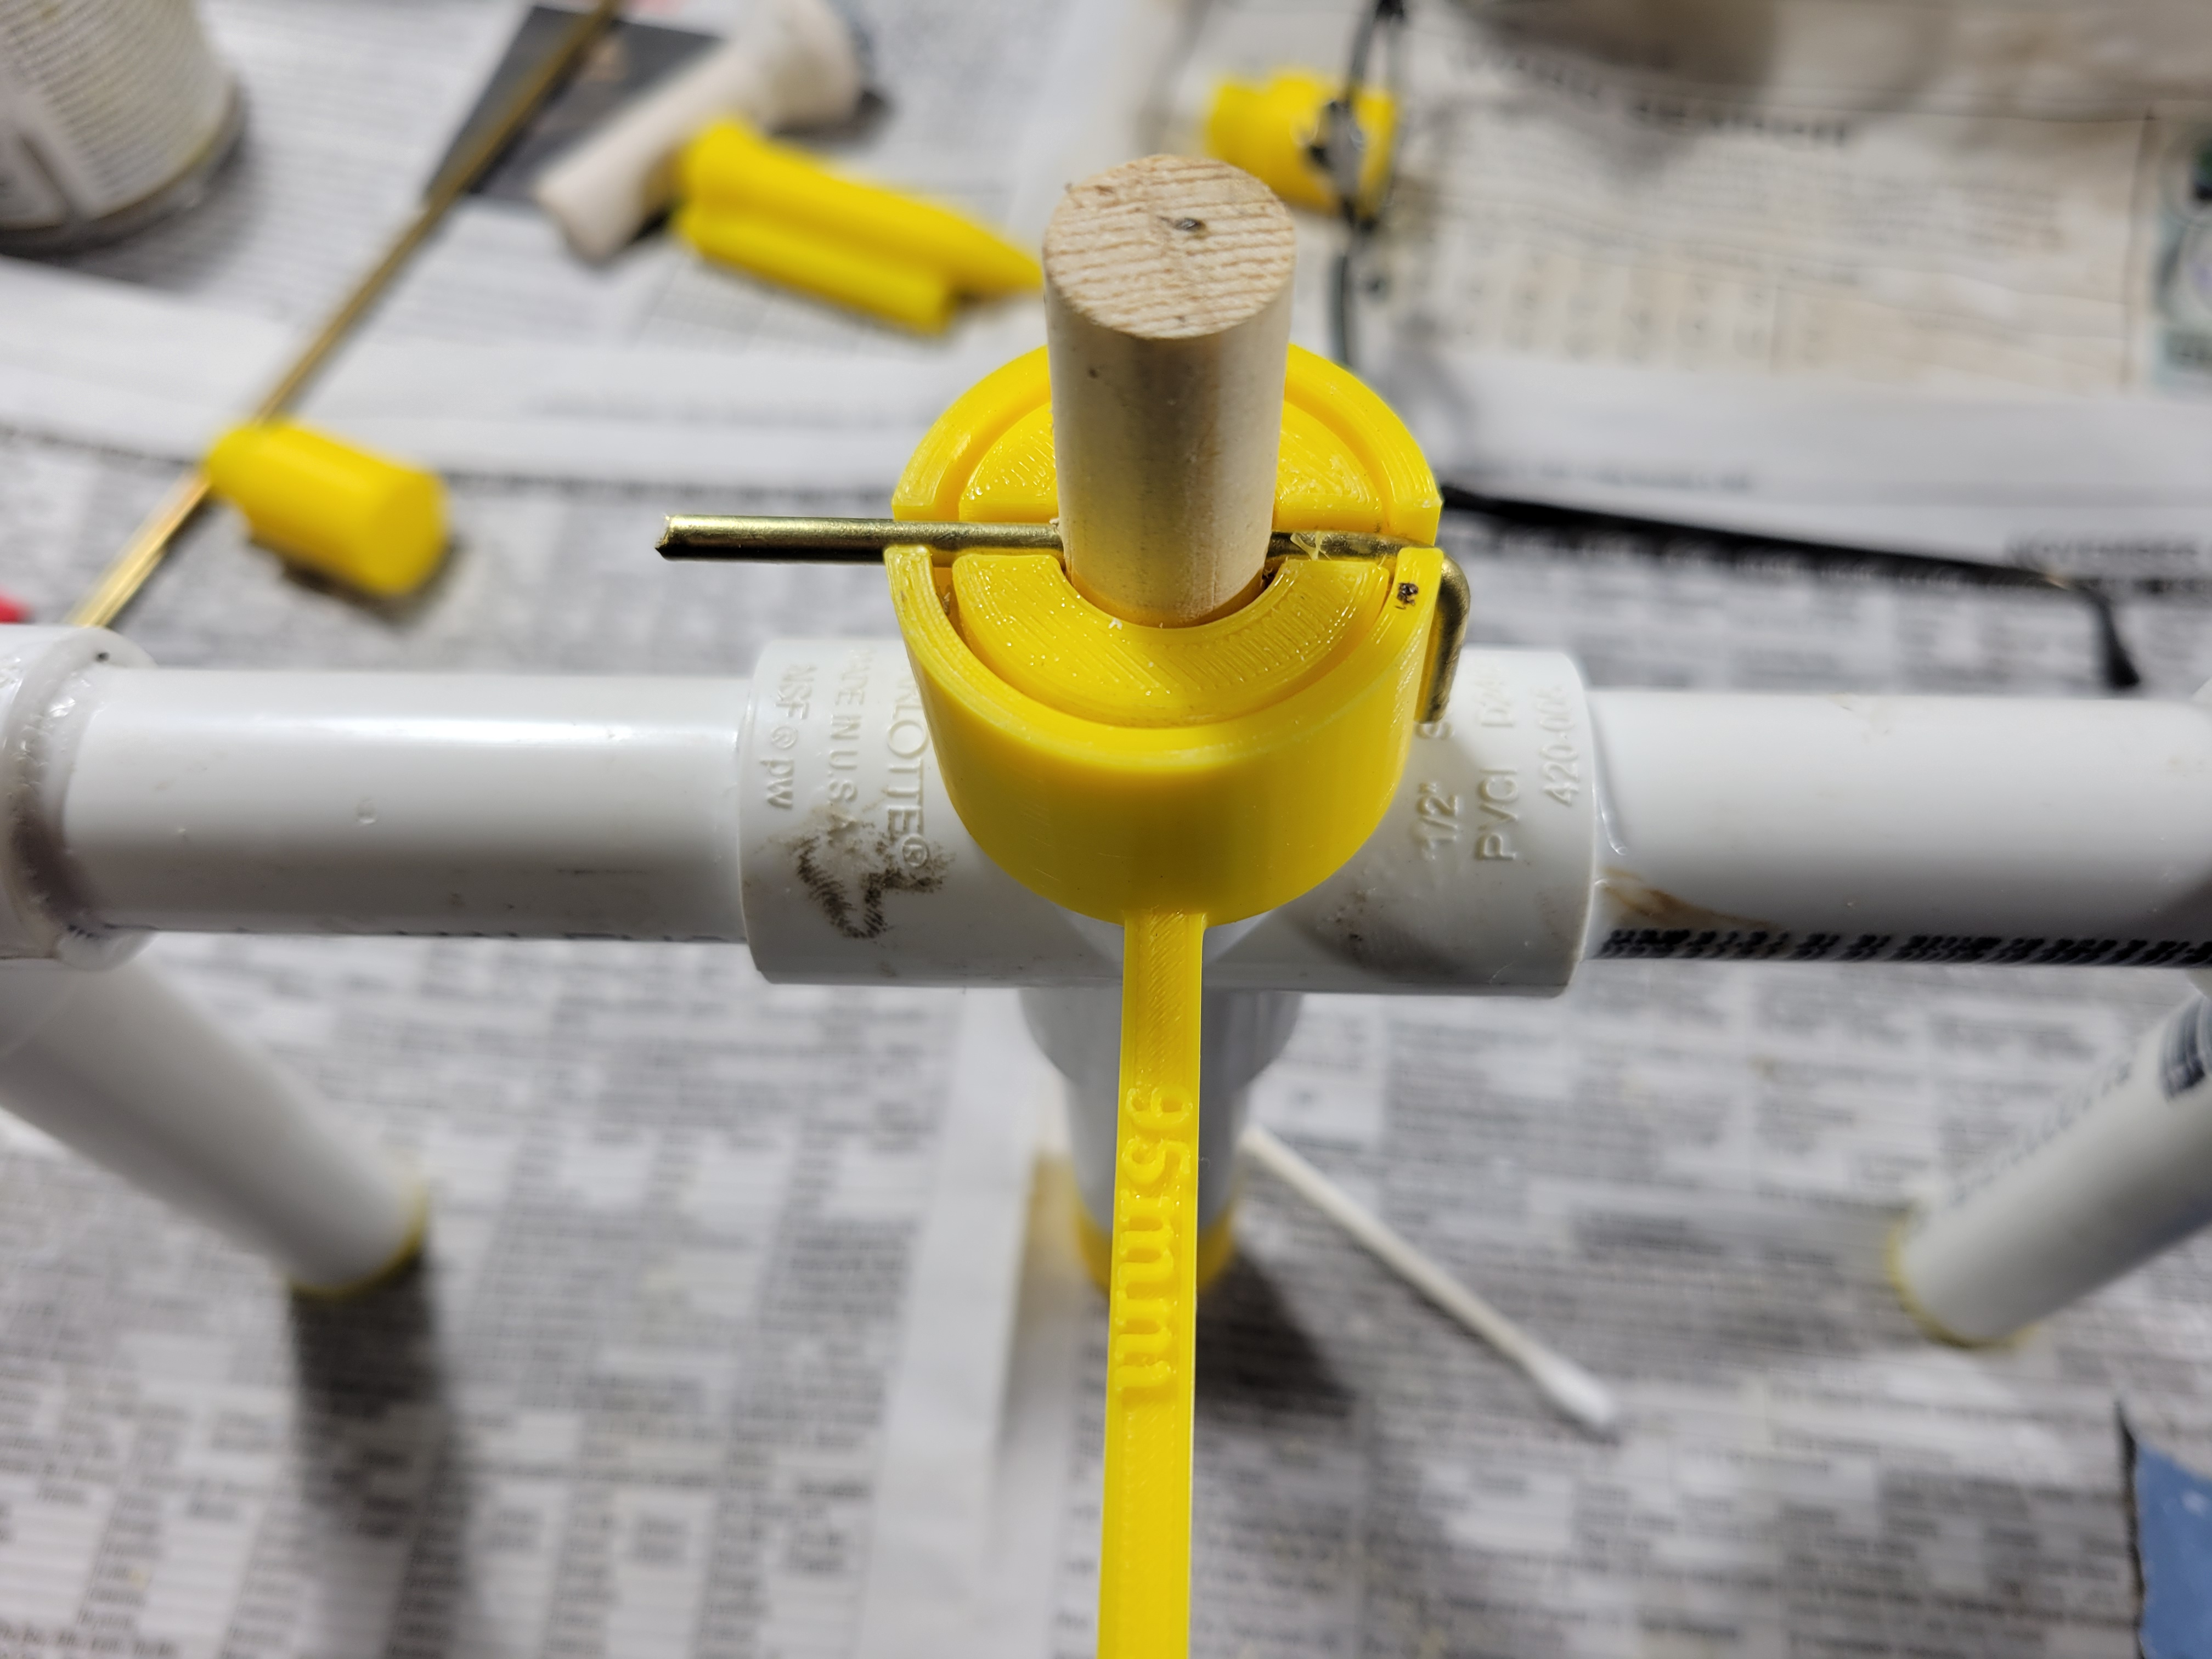
Now, you can use it like a regular ball-opener per Tom's video.
However, the Mark 2 comes with a bonus feature: a Width Gauge. I designed this because, in order to make matching pieces, I also wanted to make sure to open each hole the exact same amount. The way you use it is this: before locking in the dowel with the brass rod, you slide the Width Gauge over the top of the 4-Way, ringing the Top End, with the slots matching up. Then lock everything in place with the brass rod. Put a toothpick in the little hole, pointing down. When you throw, follow the toothpick with your eye to see if you've opened the hole the right amount.
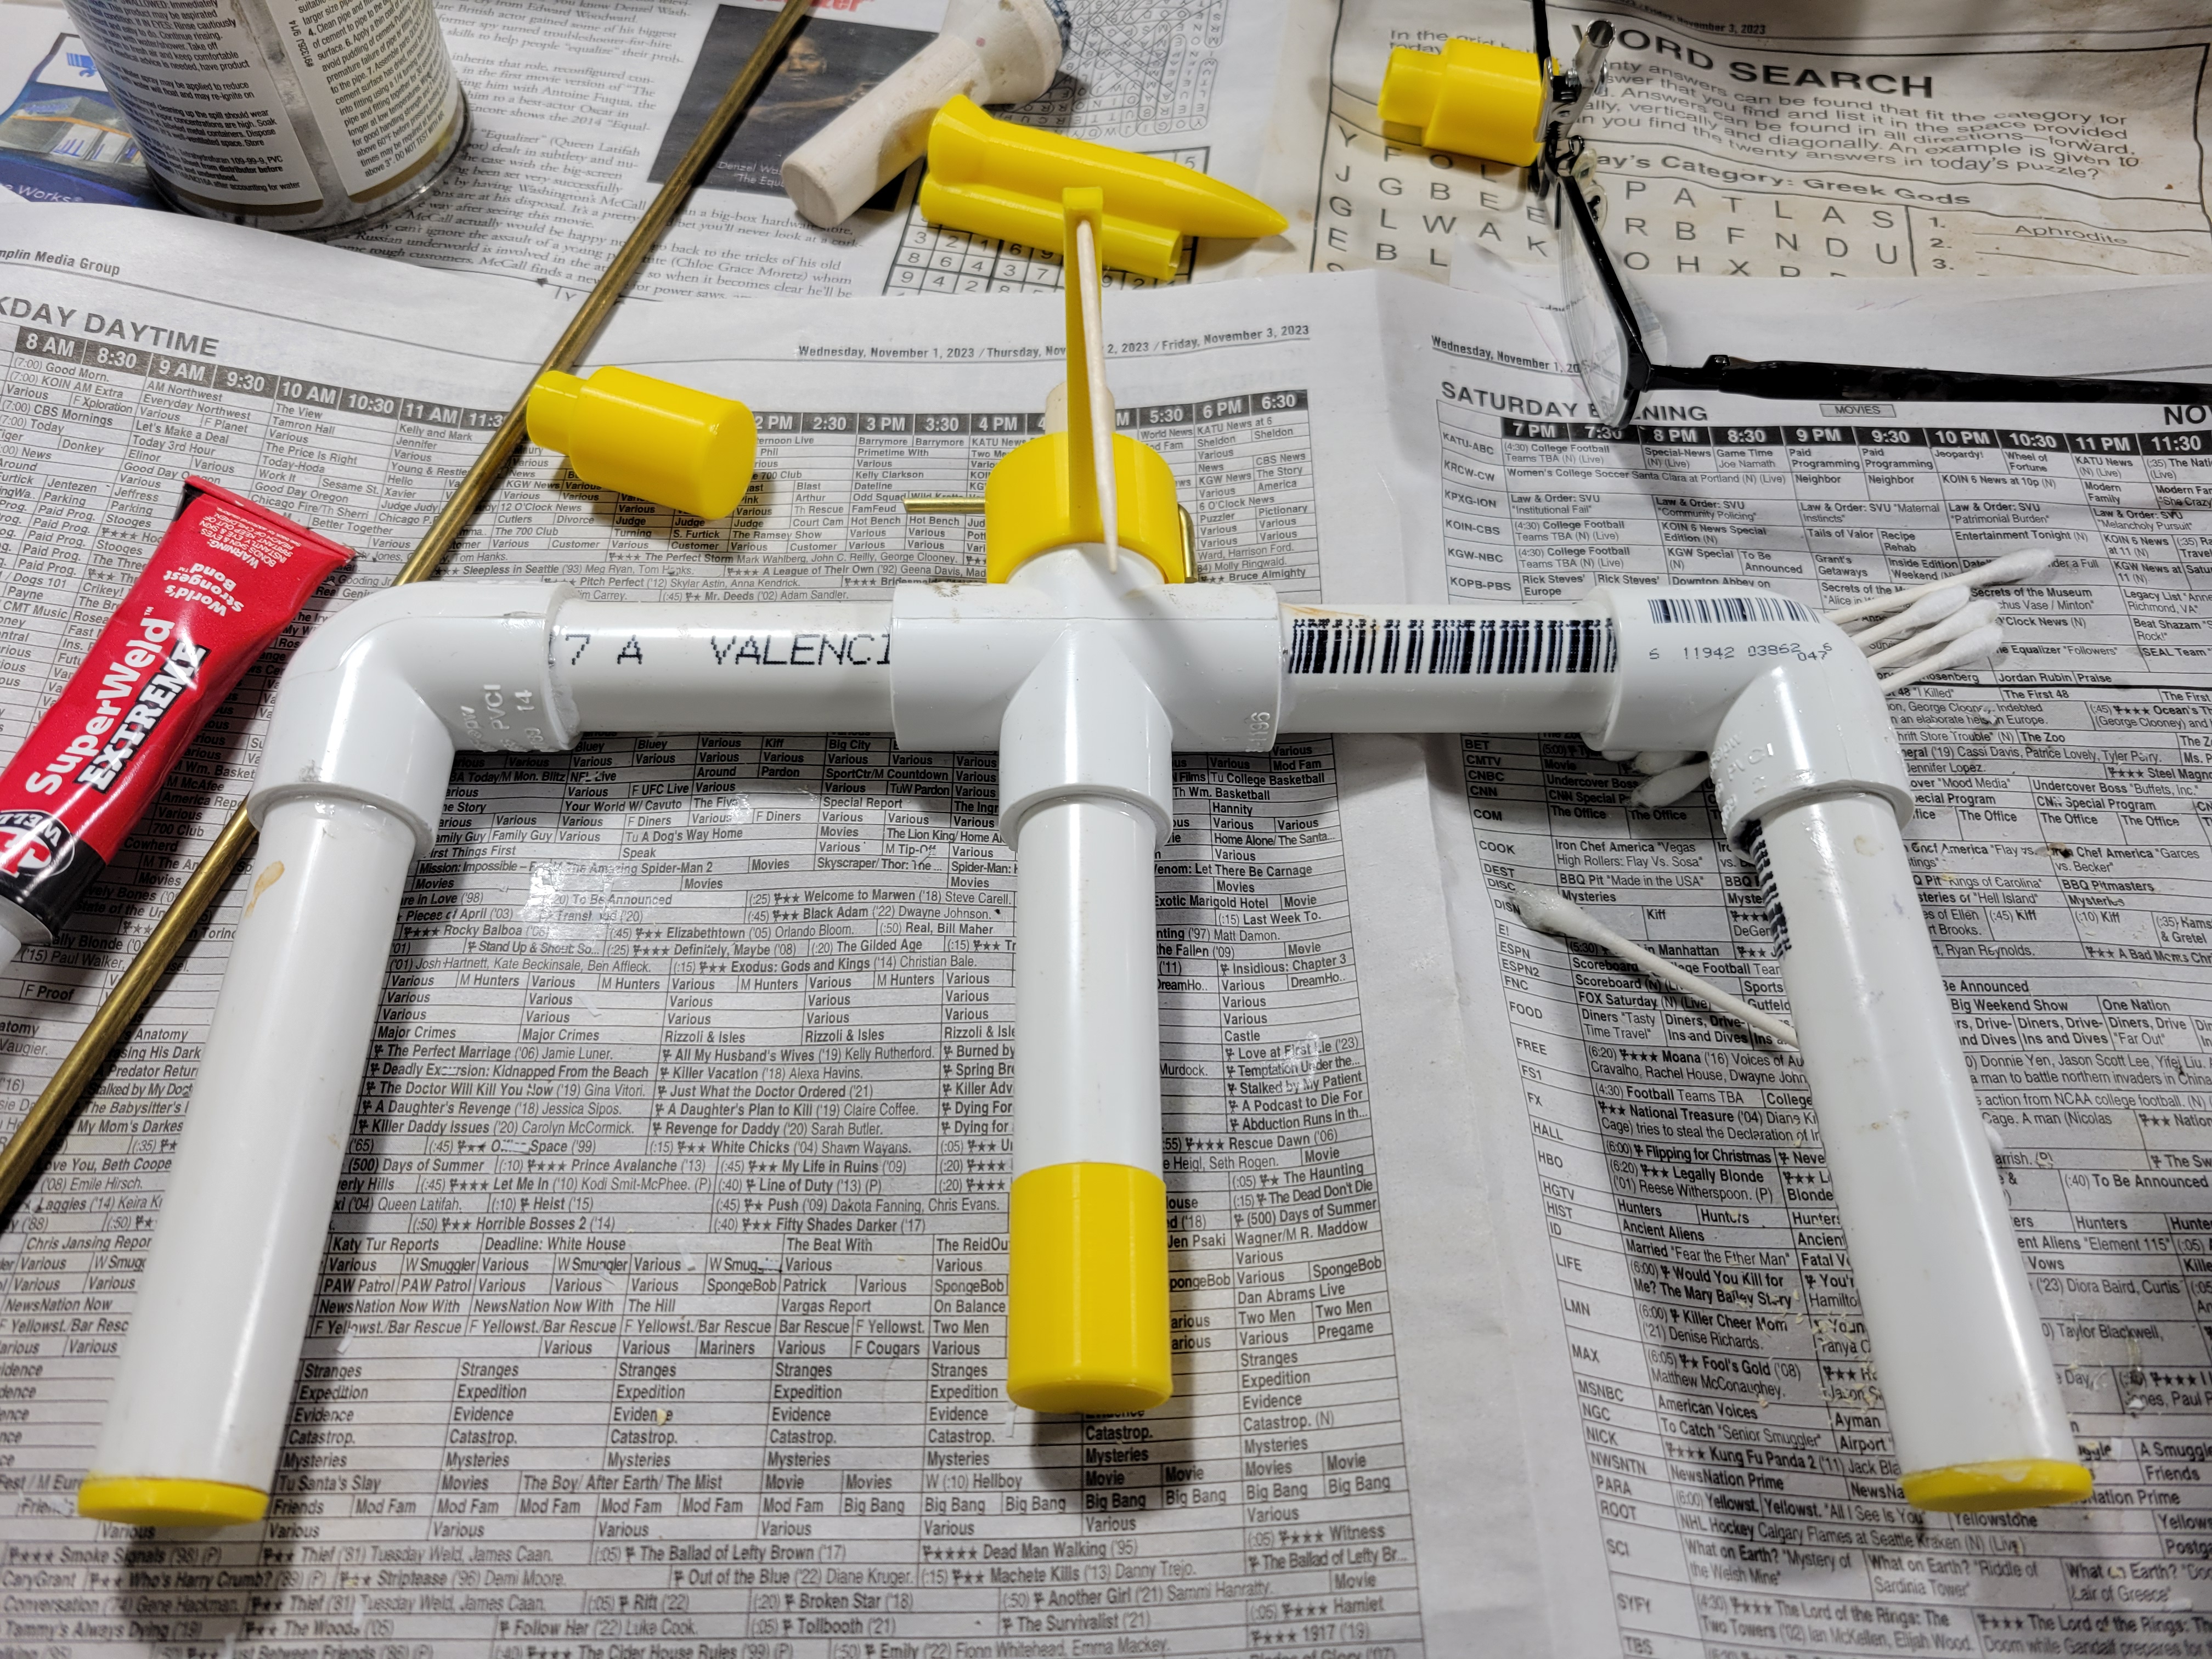
The example width gauge in my 3D print set is for a hole 95mm wide. You will, of course, want to make ones a variety of sizes. Note that the flat bar needs to be 27mm shorter than the desired hole width, because of the width of the ball opener itself. Eventually I'll create an OpenSCAD template for generating them.
On to the Next
I hope you enjoy building and customizing your own Mark 2 Ball Opener.
For me: it's been a learning experience, and I already know how I want to build the Mark 3.
Q&A
Why use PVC plus 3D prints instead of 3D printing the whole thing?
Extruded filament plastic, regardless of filament type, doesn't have anywhere near the strength of commercially formed PVC pipe. A fully 3D printed model would break in use. Another artist is experimenting with resin printing, and I'll update this based on what they find out.
Why not just make a bunch of all-PVC standard ball openers at different heights?
Because that would have been a lot less fun, and take up more space. Also, this design has some other advantages like the width gauge.
Is it important that all my pipe and wood cuts are exactly perpendicular and smooth?
Yes.
Why do you mix American and metric measurements?
Sorry, I live in the USA, that's how things are here. If you're in another country and want to make an all-metric one, you'll need to redo the measurements yourself.